
Here we have penned down easy to follow guide for you, it is about to create and boot from a Linux USB drive on Mac.
So, let us have a look at the details of this process. If you have just bought a MacBook Air, then make sure that you do a dual boot, Mac OS X, completely and thoroughly with Ubuntu Linux.
Furthermore, if you are using Windows, then this bootable process comes out to be fairly easy and simple. It does not any involve many technicalities.
Moreover, if your MacBook Air does not have a CD drive, then you can go on creating a live USB right there in Mac OS X. Now, coming to the main topic of this piece of writing, below you read the desired and needed details:
Method to Create and Boot from a Linux USB Drive on Mac

This is a tricky and a little bit of complicated procedure if you want to carry out a booting process from a Linux USB drives!
But if you are going to follow the below-mentioned steps, then we are sure that your job will become an ease. We have divided this guide into a certain and specific number of steps.
Still, if you have any question on this booting process, then you can ask from us! This whole guide and method are based on seven steps.
And it is not expected from you to skip any of the steps. Keenly follow this guide and boost from a Linux Usb drive on any Mac system model of yours.
Step 1: Formatting the USB Drive

The very first step is that you have to carry out and do the formatting of your USB drive. In this Mac OS X, there you are going to see specific kind of file system that needs formatting from your side.
Apple demand from its users to follow these standards and rules and you need to follow them too. This file system is called and marked with the name of Mac OS Extended or it is identified with the name of HFS Plus.
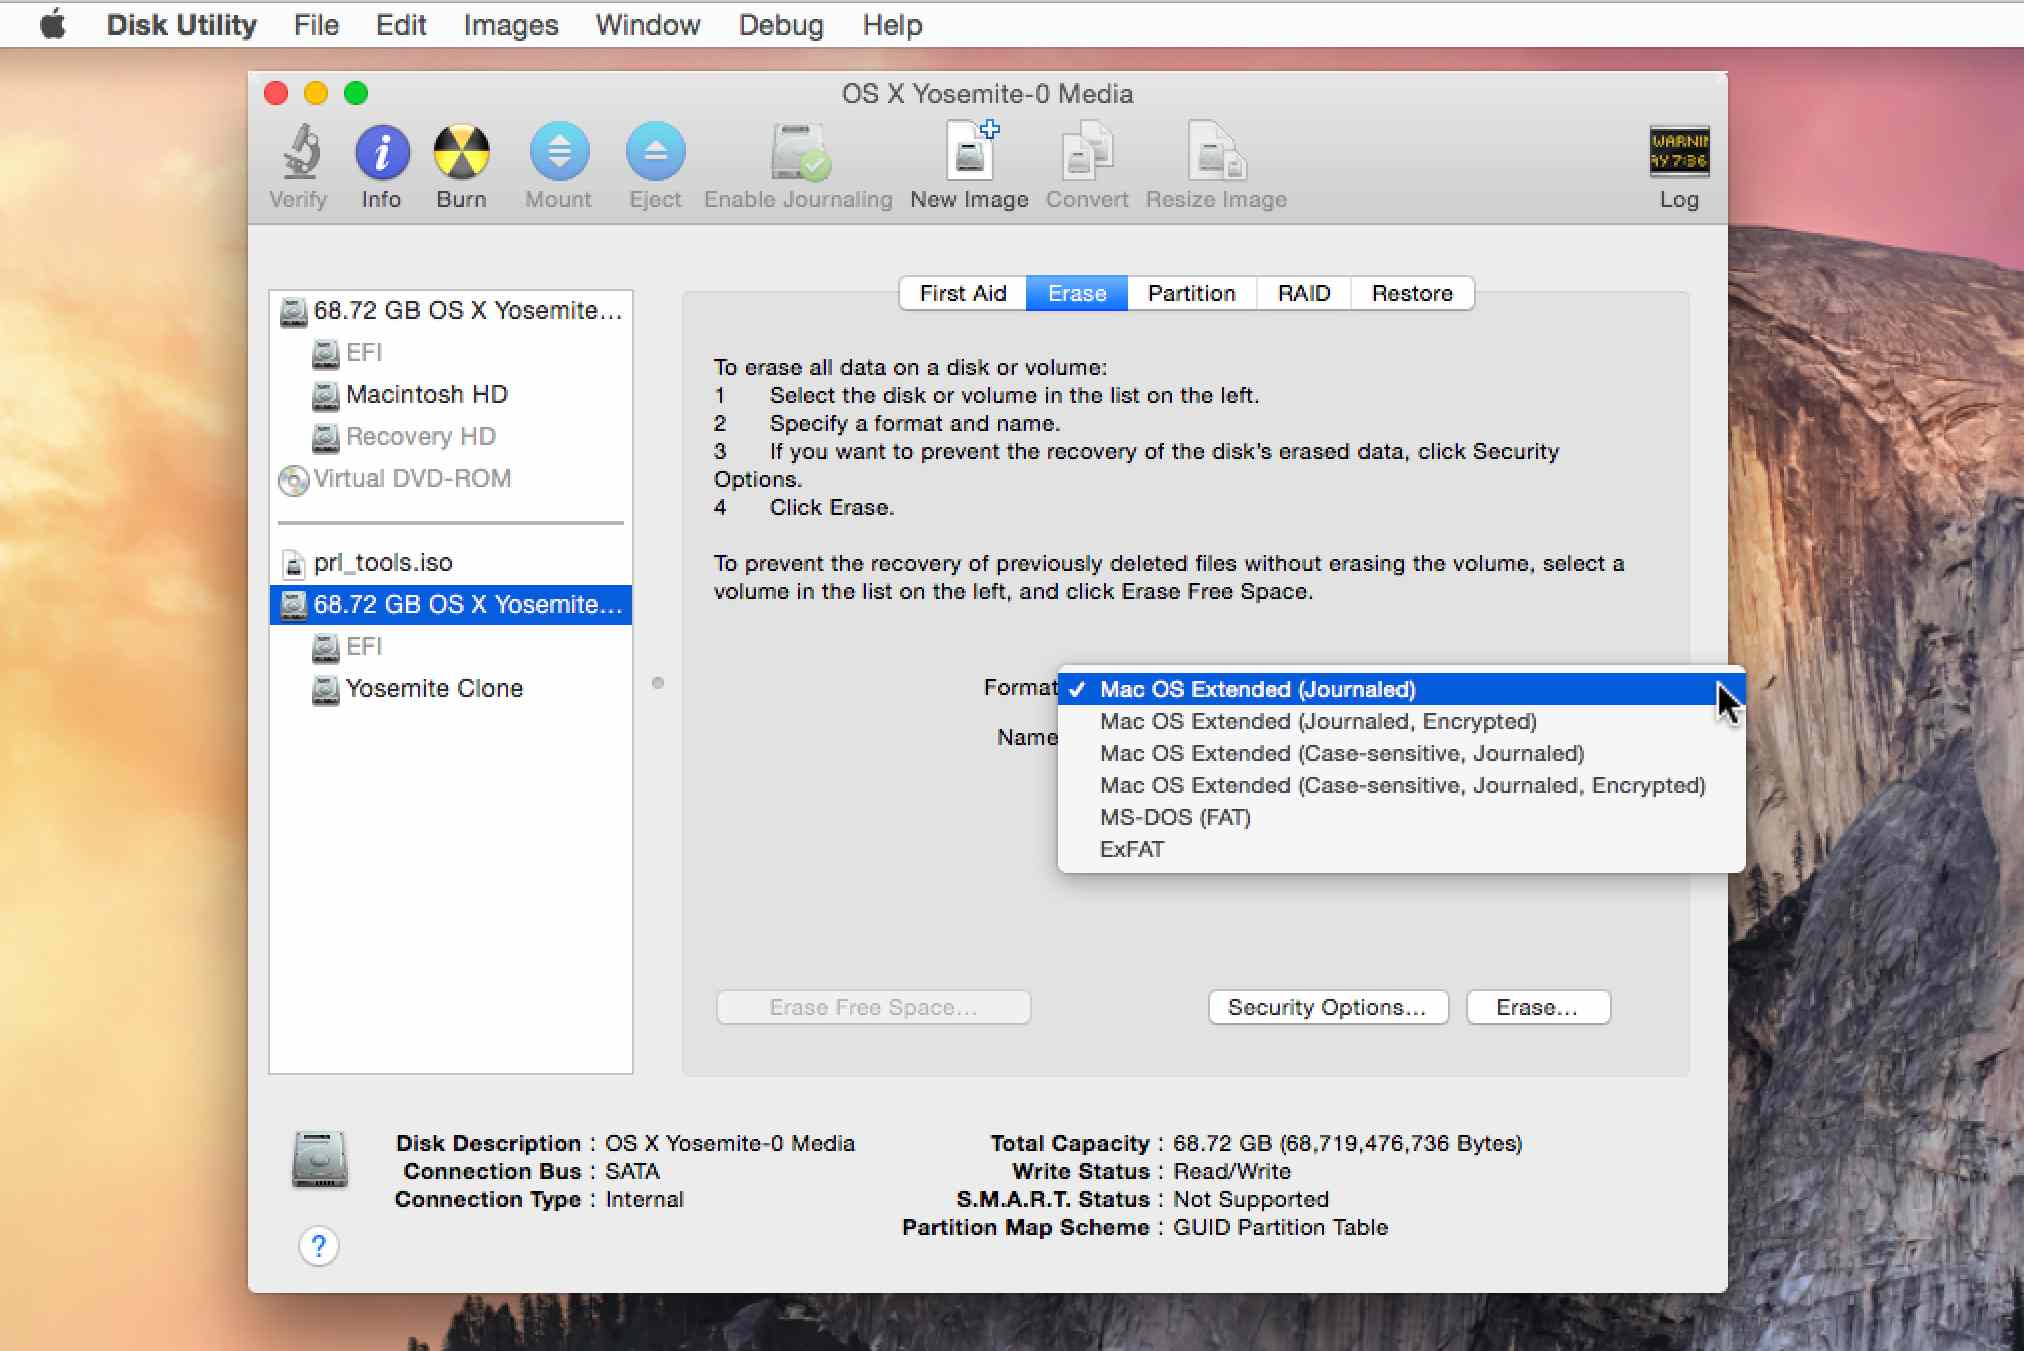
Hence, in this step, the concerned user has to be format his USB drive in the form and version of Mac OS Extended format.
Simply plug in the USB key and there you need to access the Disk Utility program. Choose the USB drive that you want to be formatted.
After that, hit on the tab that states the Partition tab and selects 1 Partition. Now, you can change and revise the Format right to Mac OS Extended.
Most importantly, you have to make sure that the partition scheme is available in the form of a GUID Partition Table. Finally, click on the Apply button and get started on formatting the USB drive of yours.
Step 2: Downloading Ubuntu Linux

Moving to the second step of this guide, now you have to do the downloading of ISO image of Linux desktop.
What you can do is to visit and reach to the Linux website. There you can download any of your favourite and desirable Ubuntu desktop OS. Besides, if you are making use of Macbook Air, then it is important for you to get the 64 Bit version.
Step 3: Converting ISO Format to IMG Format
You have to keep in mind this critical point that the file you have downloaded, it is present in ISO format. Now, you need to convert and transform this file all into IMG format.
For this conversion job, you can make use of hdiutil command tool. Once the file is going to be successfully converted, then then your file will show extension in the form of IMG.
Step 4: Getting the Device Number for the USB Drive Of Yours
In the fourth step, the user has to get hold of the device number of USB. For this step, you have to run a specific and particular command.
Once you enter the command, then a list will be provided to you in which you will get all of the disks information that is installed in your system.
You can identify and know about the USB disk of yours on the basis of its size. Still, if you think that there are chances and probability of confusion, then it will better if you plug and insert just one USB drive. As soon as you get the disk number, then the next proceeding is going to be started.
Step 5: Creating the Bootable Version of USB Drive

Now you have entered into the process of creating and developing a bootable version of the USB drive. You can use add command in this regard.
This is one of the powerful commands that you can use and try out. Furthermore, you need to use it with much care and caution.
If you fail to remember the USB drive number of yours, then there is a chance that you may corrupt and infect your Mac OS X system. This step will take a few of the minutes of yours to proceed and move onto the next step.
Step 6: Complete the Process Linked to a Bootable USB Drive
When you see that this specific command known as dd command is done with its processing, then you will get a dialogue text box.
This box will communicate a message to you that the disk that you inserted, it failed to get readable from your PC computer system.
Upon getting this message, there is no need to click on the options that states Initialize, Ignore or on the button of Eject just now.
Simply access the terminal and use the respective command for the sake of ejecting your USB disk. Once it is going to be ejected, then you can click on the Ignore button present in the dialogue box.
On this step, your bootable USB disk is all set and ready.
Step 7: Check And Verify Your Newly Created and Developed Bootable USB Disk
Moving to the last step of this process! It is about checking as well as verifying your newly created and upgraded bootable USB disk.
You can test this phase as well. For that, you have to plug in the bootable USB and after that, you have to allow your system to go through the booting process.
Moreover, when Apple tune starts and initiates up, then you need to keep on pressing and holding the option of Alt key.
This is all about this guide, this is how you can create and boot from a Linux USB drive on Mac system of yours.
Once you follow all these steps of this guide, this whole lengthy processing and job will become easy for you.
This testing and verification phase is very important for you. It will remove all queries and you can well know whether you have proceeded this step correctly or not.
Conclusion!!!
We hope that this guide will make your job a little bit easy and convenient for you. If you still have any queries on creating a bootable USB disk from Linux USB drive for Mac, then you can ask from us any time.
To catch up with the guides like dual booting, we will sooner share details about it. Keep connected with us.
If you had previously followed this kind of method and it did not work out for you, then we guarantee you that it will work for you now.
Will this work for USB HDD?